Diy Snow Bicycle Conversion: Glide into Winter Fun!

As an affiliate, we may earn from qualifying purchases. We get commissions for purchases made through links on this website. You can read more on our Affiliate Disclaimer here.
Diy Snow Bicycle! Converting a regular bicycle into a snow bicycle involves attaching ski attachments to the wheels. This modification enables biking in snowy conditions.
Snow cycling has become increasingly popular as adventurers seek new ways to enjoy winter landscapes. For cycling enthusiasts unwilling to put away their bikes for the winter, a DIY snow bicycle offers the perfect solution. This modification typically involves replacing the front wheel with a ski and adding a wider, treaded back tire or another ski for improved traction on the snow.
Crafting a snow bicycle at home requires some mechanical know-how, but it opens a new realm of possibilities for winter sports. Enthusiasts can now glide across snow-covered trails and slopes, combining the thrill of skiing with the familiar joy of cycling. Building a snow bicycle is not only a rewarding project but also an innovative way to explore and stay active during the colder months.
Credit: ebikebc.com
Diy Snow Bicycle Conversion
With winter’s embrace comes the opportunity to transform your everyday bicycle into a snow-conquering machine. A DIY snow bicycle conversion allows cycling enthusiasts to continue their passion despite the icy grip of winter. This custom modification not only upgrades your ride to tackle the tough terrain of snow and ice, but it also enhances your winter experience. Venturing into such a project requires careful planning, the right tools, and a dash of creativity. Below, we delve into the essentials of creating your very own snow bicycle.
Choosing The Right Bicycle
Selecting the base for your DIY snow bicycle is a critical step. Not every bike will be suitable for conversion; durability and frame size are key. Ideally, mountain bikes or fat bikes with their robust frames are perfect contenders. Look out for a bike that can accommodate the wider tires necessary for snow terrain. It should also have enough clearance around the forks to prevent snow from clogging. Strong brakes are a must-have for safety on slippery surfaces, with disc brakes being the preferred choice.
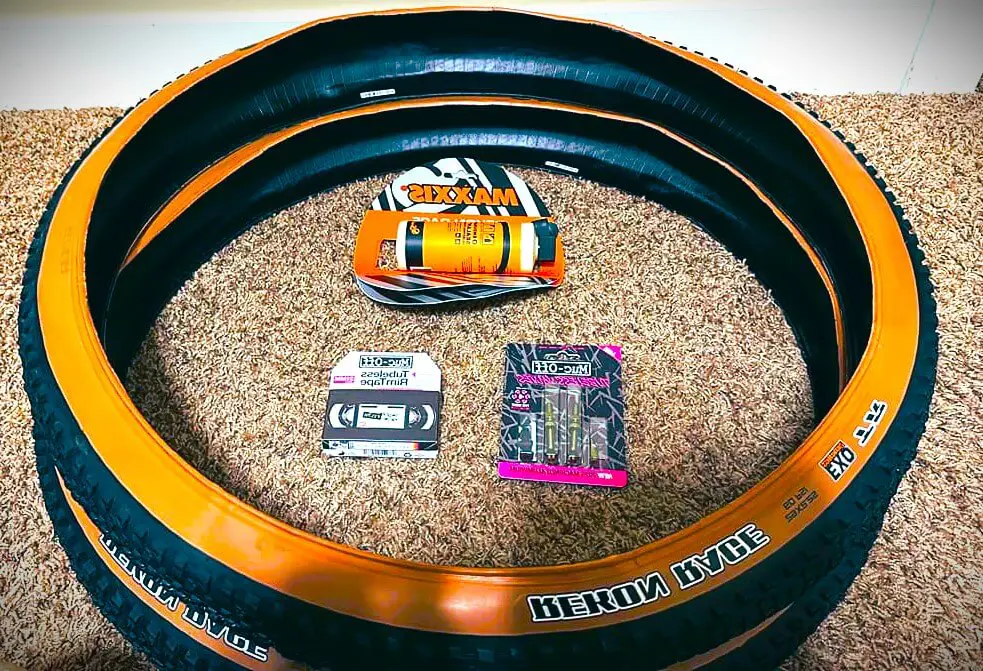
Essential Tools And Materials
Before diving into your DIY project, ensure you have all the necessary tools and materials at hand. The transformation process requires a combination of basic and specialized tools. Here’s a handy list you should consider:
- Allen Wrench Set: For tightening and adjusting bolts and screws.
- Wire Cutters: Handy for trimming cables.
- Tire Levers: Essential for changing tires.
- Wrench Set: For various adjustments and installations.
In addition to tools, several materials are also needed for a successful conversion:
- Snow Tires: Wide with deep treads, these are the foundation of your snow bicycle.
- Tubeless Tire Sealant: This will help to prevent punctures in the snowy terrain.
- Insulation Tape: To protect your bike frame from the cold and moisture.
- Additional Screws and Bolts: Always good to have on hand for unexpected replacements.
Ensure that each tool and material is ready before starting your conversion. It’s better to be over-prepared than to find yourself missing a crucial component mid-project.
Bike Modification Process
Transform your standard bicycle into a winter-ready chariot with this guide to DIY snow bicycle conversions. Tackling icy terrains requires a sturdy, modified bike. Here’s how to gear up for snow-laden adventures, step-by-step, ensuring safety and performance when the temperatures drop.
Prepping The Bike Frame
The first step in the modification process is to get your bike frame ready for snowy conditions. Adequate preparation is essential to ensure parts fit correctly and function efficiently. Start by stripping your bike down to its frame and cleaning it thoroughly to remove any dirt or grime. Carefully assess the frame for any signs of damage or wear and address these issues before proceeding.
- Remove rust and apply anti-corrosion treatments
- Check alignment and straighten any bent components
- Apply a fresh coat of paint if necessary to protect against the elements
Attention to these details will create a solid foundation for subsequent modifications, optimizing the bike’s performance on snow-covered paths.
Installing Snow Chains
To navigate through snow, traction is key. Snow chains significantly improve grip, preventing slippage on icy surfaces. Here’s how to add them:
- Measure your tires and select snow chains that fit snugly
- Lay the chains flat to ensure there are no tangles or twists
- Place the chain over the wheel and secure it tightly, ensuring even coverage
Test the chains’ tension regularly to avoid slips or damage to the bike frame. With chains in place, your bike will be set to tackle even the slickest of surfaces.
Adding Custom Brakes
Conventional brakes can falter in snowy conditions, so customizing your stopping system is vital. Opt for brakes designed to handle wet and icy conditions to enhance safety. Here’s a step-by-step to upgrade your brakes:
- Choose disc brakes for their superior performance in winter environments
- Align the brake disc with the wheel hub and secure firmly
- Install the caliper and brake pads, ensuring they are properly aligned with the disc
After installing the custom brakes, conduct thorough tests to ensure responsiveness and reliability. High-quality, well-adjusted brakes are non-negotiable for maintaining control on snowy rides.
Once these steps are completed, your DIY snow bicycle will be equipped to conquer the winter landscape. With the right modifications, winter cycling becomes not just feasible but also exceptionally thrilling.
Safety Measures
Exploring a winter wonderland on a do-it-yourself snow bicycle can be an exhilarating experience. However, it’s crucial to prioritize safety to prevent accidents and injuries. By understanding the basics of snow biking and equipping yourself with the right protective gear, you can enjoy this winter sport with confidence and peace of mind. Let’s delve into the specifics of safety measures you should consider before hitting the snowy trails.
Understanding Snow Biking
Snow biking is more than just a thrilling adventure; it’s a test of your balance and endurance. Unlike conventional cycling, snow bikes have wide, knobby tires designed to grip snowy surfaces. Riding on snow can be unpredictable, so it is paramount to understand the terrain. Be alert for hidden obstacles under the snow and adapt your speed accordingly. Staying visible is also critical; use lights and reflectors to ensure others can see you.
Protective Gear Essentials
No matter your snow biking skills, accidents can happen. Proper protective gear is essential. Always wear a helmet to shield your head in case of falls. Look for a helmet that provides warmth without compromising protection. Goggles are also vital. They protect your eyes from glare, wind, and debris. Consider layers that provide insulation while allowing mobility, and don’t forget gloves to protect your hands from the cold and improve grip.
| Protective Gear | Function | Importance |
|---|---|---|
| Helmet | Head protection | Prevents head injuries |
| Goggles | Eye protection | Shields eyes from elements |
| Gloves | Hand protection | Enhances grip, keeps warm |
Remember to check your bike’s conditions before every ride. Brakes should be responsive, and tire pressure must be suitable for snowy conditions—usually lower than for dry surfaces. This reduces slipping and helps with traction. Always inspect the frame for any signs of damage, and ensure all parts are properly lubricated to function smoothly in cold temperatures. Safety first means you can focus on the pure joy of snow biking.
Test Ride & Adjustments
Transforming your regular bike into a snow-ready chariot can be immensely gratifying, but the real test comes when you take it out for a spin. Test riding and making precise adjustments is crucial to ensure a smooth and safe experience on your DIY snow bicycle. Let’s explore the essential fine-tuning steps needed to achieve perfect balance and optimal gear settings.
Fine-tuning For Balance
Achieving impeccable balance on your snow bicycle is paramount for handling snowy terrains. The initial test ride might reveal if your bike pulls to one side or feels unstable. Begin by:
- Checking the tire pressure: Ensure both tires have even pressure suitable for snow conditions.
- Examining the alignment: The wheels should be perfectly aligned with the frame. Misalignment can cause balance issues.
- Assessing the weight distribution: Balance panniers and gear evenly to avoid tipping.
Make small adjustments and take short rides after each tweak to iteratively achieve the balance that suits your riding style and the snow conditions.
Adjusting Gear Ratio
Pedaling through snow requires a different gear ratio than regular cycling. Your objective is to find a ratio that allows for easy pedaling in soft snow while still being able to pick up speed on compacted surfaces. Start by:
- Lowering the gear ratio to ease the effort required to pedal through snow.
- Testing different sprocket combinations for the best balance between speed and torque.
- Remembering that a gear too low will cause spinning in place, while a gear too high will exhaust you quickly.
| Terrain Type | Recommended Gear Ratio |
|---|---|
| Soft, Deep Snow | Lower Ratio |
| Packed Snow | Higher Ratio |
Find the sweet spot with incremental adjustments to the gear ratio to handle various snow conditions effectively.
Enjoying Winter Adventures
Thrill-seekers and nature enthusiasts alike revel in the crisp air and shimmering landscapes of winter. Transforming your bike into a DIY snow bicycle can open up a world of exploration, where every snowfall brings a new adventure. Whether cruising through a serene snow-blanketed forest or traversing a frost-covered mountain path, a snow bicycle can carry you into the heart of winter’s splendor. Let the cold season be your playground as we delve into the exciting possibilities of riding on snowy trails and how to maintain your snow-cycling gear for peak performance and storage during the off-season.
Exploring Snowy Trails
Embarking on a ride along snowy trails is like stepping into a winter wonderland. It’s essential to ensure your snow bicycle is equipped for the terrain. Starting with wide tires for stability and traction, add low gears for easier pedaling through soft snow. A DIY snow bicycle should also feature a robust frame to withstand the cold and potential impacts. When gliding across snow-covered trails, it’s critical to dress in layers for warmth and bring along safety gear, including a helmet, lights, and a whistle.
- Research local trails and ensure they permit snow bicycles.
- Start with short rides to adjust to the conditions and your bike’s behavior on snow.
- Keep your speed moderate; slick surfaces demand careful maneuvering.
- Always tell someone your route and expected return time.
Tips For Maintenance And Storage
Regular maintenance and proper storage of your snow bicycle will extend its life and ensure safety on your wintry excursions. After each ride, remove any snow or ice from the frame and components to prevent rust. Frequently check the tire pressure, as cold air can reduce inflation, affecting performance and control. Thoroughly drying your bike and applying lubricant to the chain and moving parts will protect against moisture and corrosion.
| Maintenance Task | Frequency | Notes |
|---|---|---|
| Tire Inspection | Before and after rides | Check for the correct pressure and any signs of wear. |
| Lubrication | Weekly | Focus on chain, gears, and cables. |
| Cleaning | After each ride | Use a soft brush and wipe down to remove moisture. |
For storage, find a cool, dry place away from direct sunlight. If space allows, hang the bike to prevent tire deformation. If you must store it outdoors, use a waterproof bike cover to shield it from the elements. Remember to give your snow bicycle a thorough check-up before the start of each winter season to ensure it is ready for the snow.
- Inspect brakes and brake pads for optimal performance.
- Check for loose components and tighten them as necessary.
- Test the gear shifts and adjust if needed.
Frequently Asked Questions Of Diy Snow Bicycle
Can You Convert Any Bike To A Snow Bicycle?
Yes, many bikes can be converted into snow bicycles by adding snow tires or ski attachments. Ensure your bike’s frame and brakes are compatible with the snow-specific modifications for a successful conversion.
What Equipment Is Needed For A Diy Snow Bicycle?
For a DIY snow bicycle, you’ll need wide snow tires or ski attachments, a strong frame, appropriate gears, and possibly studded tires for ice. Specialized brakes that function well in cold conditions are also recommended.
How Do I Maintain My Snow Bicycle?
Maintain your snow bicycle by regularly cleaning and lubricating the chain, checking tire pressure and studs, and wiping down the frame to prevent rust. Store it in a dry place to avoid damage from moisture and cold.
Is Riding A Bicycle In The Snow Safe?
Riding a bicycle in the snow can be safe with the right equipment such as studded tires and ski attachments, as well as careful riding. Additionally, always wear suitable winter gear and a helmet for protection.
Conclusion
Crafting your own snow bicycle can be an exhilarating challenge. With the right tools and determination, the slopes await your unique creation. Share your build experiences and hit the wintery trails. Stay safe and relish the ride – your DIY snow bicycle is not just a mode of transport; it’s a personal triumph.

Steven is a professional cyclist and his passion is cycling. He has been cycling for the last 6 years and he loves using bikes while outing as well. Based on his experiences with the different types of bikes; he is sharing his opinions about various bikes so that a beginner can start right away. Find him on Twitter @thecyclistguy Happy Biking.