How to Take Pedals off a Road Bike: Quick & Easy Guide

As an affiliate, we may earn from qualifying purchases. We get commissions for purchases made through links on this website. You can read more on our Affiliate Disclaimer here.
To remove pedals from a road bike, use a pedal wrench to loosen the pedals by turning counterclockwise. Ensure the bike is stable before starting.
Removing pedals from a road bike is essential for maintenance, transport, or upgrades. A pedal wrench or Allen key is usually required for this task. Properly securing your bike on a stand or against a wall helps maintain stability during the process.
Pedals can have standard or reverse threads, so knowing which way to turn is crucial. Regular maintenance of your bike’s pedals ensures smooth operation and prolongs the life of your components. It’s a straightforward task that can save you time and money on repairs. Always check your bike’s manual for specific instructions and torque settings.
Introduction To Pedal Removal
Removing pedals is a crucial bike skill. It ensures smooth rides always. Pedals can get stuck or damaged. Regular checks prevent this. You save money on repairs. It also keeps your bike safe.
Maintaining your bike extends its life. It ensures every ride is safe. Regular checks catch problems early. This prevents costly repairs later. Your bike remains in top condition. Enjoy smoother, safer rides always.
| Tool | Purpose |
|---|---|
| Pedal Wrench | Loosen and tighten pedals |
| Allen Key | Remove pedals with Allen bolts |
| Grease | Prevent pedals from sticking |
| Rag | Clean pedal threads |
Preparation Steps
Gather the necessary tools, including a pedal wrench or Allen key, and position the bike securely. Ensure proper orientation by identifying the left and right pedals.
Secure Your Bike
Place your bike on a sturdy stand. Ensure it won’t move. Lock the brakes if possible. This keeps the bike steady. You need both hands free. A stable bike avoids accidents. Check the bike’s balance. It should not wobble. Keep tools close.
Clean The Pedal Area
Wipe the pedal area with a cloth. Remove any dirt or grease. A clean pedal area makes work easier. Check both sides of the pedal. Ensure the crank arm is clean too. Use a degreaser if needed. Clean tools work better. This keeps threads from slipping.
Identifying Pedal Orientation
Pedals have different threads. The right pedal tightens clockwise. The left pedal tightens counter-clockwise. This helps pedals stay secure. Look for markings on the pedals. The right pedal might have an “R”.
The left pedal might have an “L”. Using the correct tools is important. A pedal wrench works well. An Allen key can also help. Keep your bike steady while working.
Choosing The Right Wrench
There are different types of wrenches. Some common types are adjustable wrenches, Allen wrenches, and pedal wrenches. Adjustable wrenches can fit many sizes. Allen wrenches are used for hex bolts. Pedal wrenches are made for bike pedals.
Wrench size is very important. A wrong size can damage the pedal. Most pedals need a 15mm wrench. Some pedals use an Allen wrench. Check your bike manual for the right size.
Loosening The Pedals
Position your bike on a stable surface. Ensure you have enough space. Place the pedal wrench on the pedal axle. Hold the bike frame for stability. Make sure the pedal is at the bottom. This positioning helps you apply force better. Use a cloth to protect the bike frame.
Apply force in the correct direction. For the right pedal, turn counterclockwise. For the left pedal, turn clockwise. Push down on the wrench firmly.
Use both hands for better control. If it’s tight, use more force. Be careful not to hurt yourself. Once loose, spin the pedal off by hand.

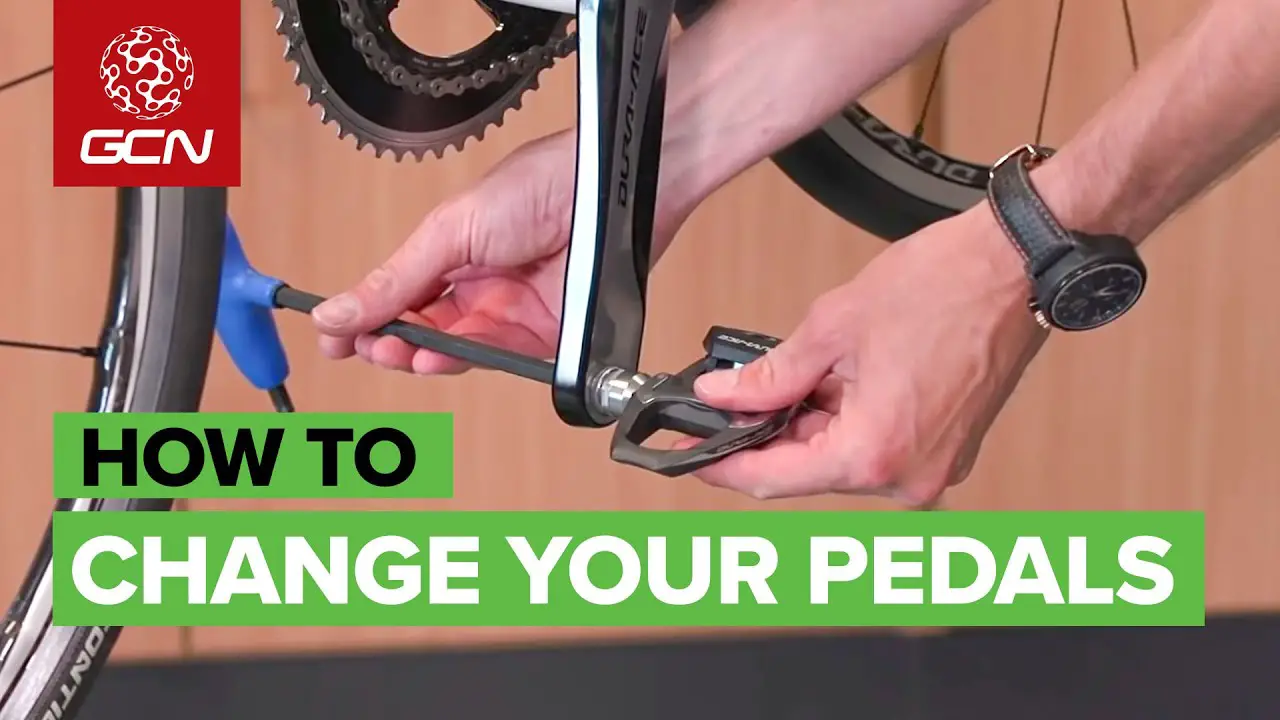
Credit: www.youtube.com
Removing The Pedals
Removing the pedals from a road bike is straightforward. Start by turning the crank arm to access the pedal. Use a pedal wrench to loosen and remove each pedal.
Step-by-step Removal
Use a pedal wrench or Allen key. Turn the right pedal counterclockwise. Turn the left pedal clockwise. These directions are opposite. Ensure the bike is stable. You can use a bike stand. This will make it easier. Remove the pedals carefully. Don’t rush the process.
Troubleshooting Stuck Pedals
Pedals can get stuck. Apply some penetrating oil. Let it sit for a while. Try using the wrench again. If still stuck, use more force. Be careful not to damage the bike. You can also use a rubber mallet. Tap the wrench gently.
Inspecting And Cleaning
Check the pedals for cracks. Look for any dents or bends. Spin the pedals. Make sure they turn smoothly. Feel for rough spots or grinding. Wobbling pedals need attention. Replace if they are too damaged.
Use a clean cloth to wipe the threads. Remove any dirt or grease. You can use a brush for deep cleaning. Apply a small amount of bike grease on the threads. This helps prevent rust. It also makes reassembly easier.
Reinstalling Or Replacing Pedals
First, clean the pedal threads. Then, apply grease to the threads. Grease helps to prevent rust. It also makes future removal easier.
Start by screwing the pedals by hand. This avoids cross-threading. Turn the right pedal clockwise. Turn the left pedal counterclockwise. Hand tighten until snug.
Use a pedal wrench for final tightening. Make sure the pedals are secure. Do not over-tighten to avoid damage. Check the pedals for smooth operation.
Safety Checks Post-installation
Check if the pedals are tight. Use a wrench to ensure this. Loose pedals can be dangerous. Hold the pedal still while tightening. Repeat this for both pedals. Always double-check for any movement. Firmly press down on the pedals.
Take a short ride to test. Pedal slowly at first. Feel for any loose movement. Listen for any strange sounds. Stop immediately if anything feels wrong. Make adjustments as needed. Pedal harder once you feel safe.

Credit: www.wikihow.com
Maintenance Tips
Check your bike pedals each month. Look for any loose parts. Tighten any bolts that are not tight. Clean the pedals with a cloth. Make sure there is no dirt or rust. Lubricate the pedal threads. This helps them move smoothly.
Seek help if pedals make noise. Go to a bike shop if you see cracks. Ask a professional if pedals are stuck. Experts can fix hard problems quickly. Never force the pedals off. You could damage the bike frame. Trust the experts for major repairs.
Common Mistakes To Avoid
Do not tighten pedals too much. This can damage the pedal threads. Tighten pedals only as much as needed. Use a torque wrench if unsure.
Start by threading pedals by hand. Ensure threads are aligned correctly. Never force pedals into the crank arm. Cross-threading can ruin the crank arm.
Pedal washers protect the crank arm. Always use pedal washers. They prevent damage and ensure a secure fit. Do not skip this step.

Credit: www.bicycling.com
Frequently Asked Questions
How To Remove Pedals On A Road Bike?
Use a pedal wrench to turn the pedals counterclockwise to remove. Apply grease to threads for easy reinstallation.
Are Road Bike Pedals Reverse Threaded?
No, road bike pedals are not reverse threaded. The right pedal is threaded normally, and the left pedal is reverse threaded.
Which Way Do You Twist Off Bike Pedals?
Twist off the right pedal counterclockwise and the left pedal clockwise. Use a pedal wrench for better grip.
How To Remove Pedals From Bike Without Pedal Wrench?
Use a 15mm open-end wrench or an adjustable wrench. Turn the right pedal counterclockwise and the left pedal clockwise to loosen.
How Do You Remove Bike Pedals?
Use a pedal wrench to unscrew the pedals. Turn counterclockwise for the right pedal, clockwise for the left.
Conclusion
Removing pedals from a road bike is a simple process with the right tools. Always remember to turn the pedals correctly. Regular maintenance ensures smooth rides and extends bike lifespan. Follow these steps carefully, and you’ll handle pedal removal like a pro.
Happy cycling!

Steven is a professional cyclist and his passion is cycling. He has been cycling for the last 6 years and he loves using bikes while outing as well. Based on his experiences with the different types of bikes; he is sharing his opinions about various bikes so that a beginner can start right away. Find him on Twitter @thecyclistguy Happy Biking.


