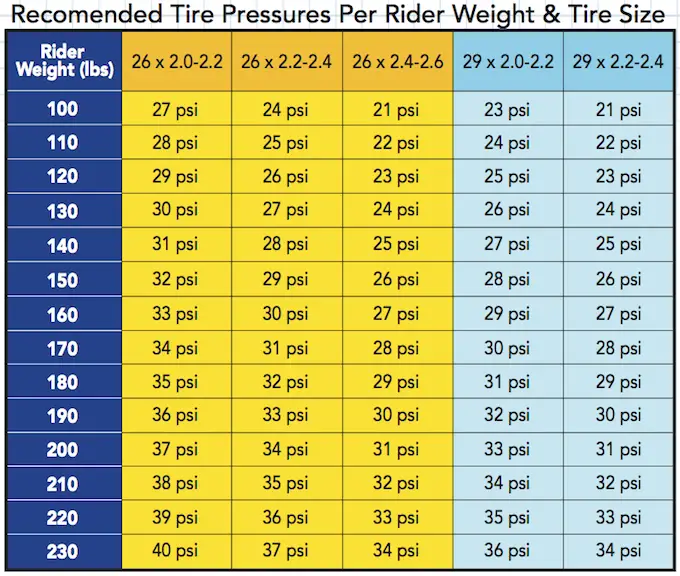
Ideal mountain bike tubeless tire pressure typically ranges from 25 to 35 psi. Your weight and riding conditions should dictate the precise pressure.
Selecting the right tubeless tire pressure for your mountain bike enhances grip, comfort, and performance. Tire pressure affects traction, control, and the way your bike handles on the trail.
Riders must consider factors such as tire width, rider weight, and terrain when adjusting their tire pressure.
Lower pressures can improve traction but increase the risk of pinch flats and rim damage; conversely, higher pressures reduce rolling resistance but can lead to a harsher ride.
Balancing these factors is key to optimizing your mountain biking experience. Checking and adjusting tire pressure before each ride ensures you have the best setup for the conditions of the day.
Remember, personal preference plays a significant role, so experimentation is encouraged to find the sweet spot for your individual riding style and the trails you frequent.
Credit: www.reddit.com
The Importance Of Correct Tire Pressure
Setting the right tire pressure is crucial for mountain bikers. It affects grip, comfort, and control. Too high or too low pressure can spoil your ride. Let’s explore how tire pressure shapes your mountain biking experience.
Impact On Performance
Tire pressure can make or break your ride. The right amount gives you the best grip. It helps you roll faster and smoother. You can take turns confidently. It also reduces the risk of punctures. See the table below for ideal pressure ranges.
| Rider Weight | Light Terrain | Rough Terrain |
|---|---|---|
| < 150 lbs | 22-25 psi | 25-28 psi |
| 150-200 lbs | 25-28 psi | 28-32 psi |
| > 200 lbs | 28-32 psi | 32-35 psi |
Match your weight to the terrain. Adjust for comfort and control.
Influence On Tire Lifespan
Correct pressure also extends tire life. Low pressure can cause sidewall flex. This leads to cracks and wear. High pressure stresses the tire tread. It makes tires prone to damage. Follow these tips for long-lasting tires:
- Check pressure before every ride
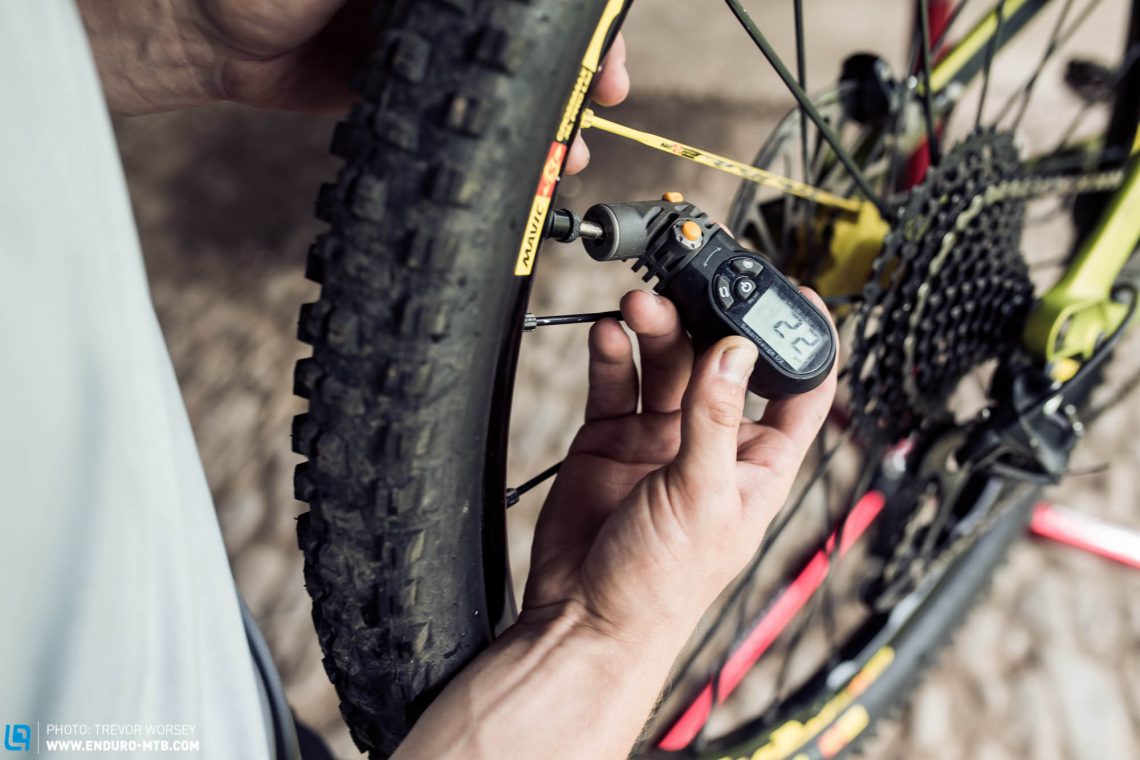
- Use a reliable gauge
- Adjust for temperature changes
Proper care keeps tires rolling longer.
Credit: enduro-mtb.com
Tubeless Tires Demystified
Let’s dive into the world of Tubeless Tires Demystified. Many riders are switching to tubeless tires. Why? They offer many benefits over traditional tubes. This shift can seem complicated, but it’s quite simple. Let’s break it down.
Benefits Over Traditional Tubes
Tubeless tires have several key advantages:
- Less Flats: Without a tube, risk of punctures drops.
- Better Grip: Lower pressures improve traction on trails.
- Improved Comfort: Softer ride with less pressure.
- Weight Savings: No tubes mean lighter wheels.
How Tubeless Systems Work
A tubeless tire system is simple in concept.
- Sealant: Fills small punctures automatically.
- Tire and Rim: Form a tight seal without a tube.
- Air Pressure: Kept by the seal between tire and rim.
This setup eliminates the need for a traditional inner tube. The sealant inside the tire fixes small punctures. This means less stopping to fix flats.
Factors Affecting Tubeless Tire Pressure
Understanding tubeless tire pressure is key to a great ride. The right pressure boosts performance and comfort. It also reduces tire wear. Let’s look at what affects it.
Rider Weight
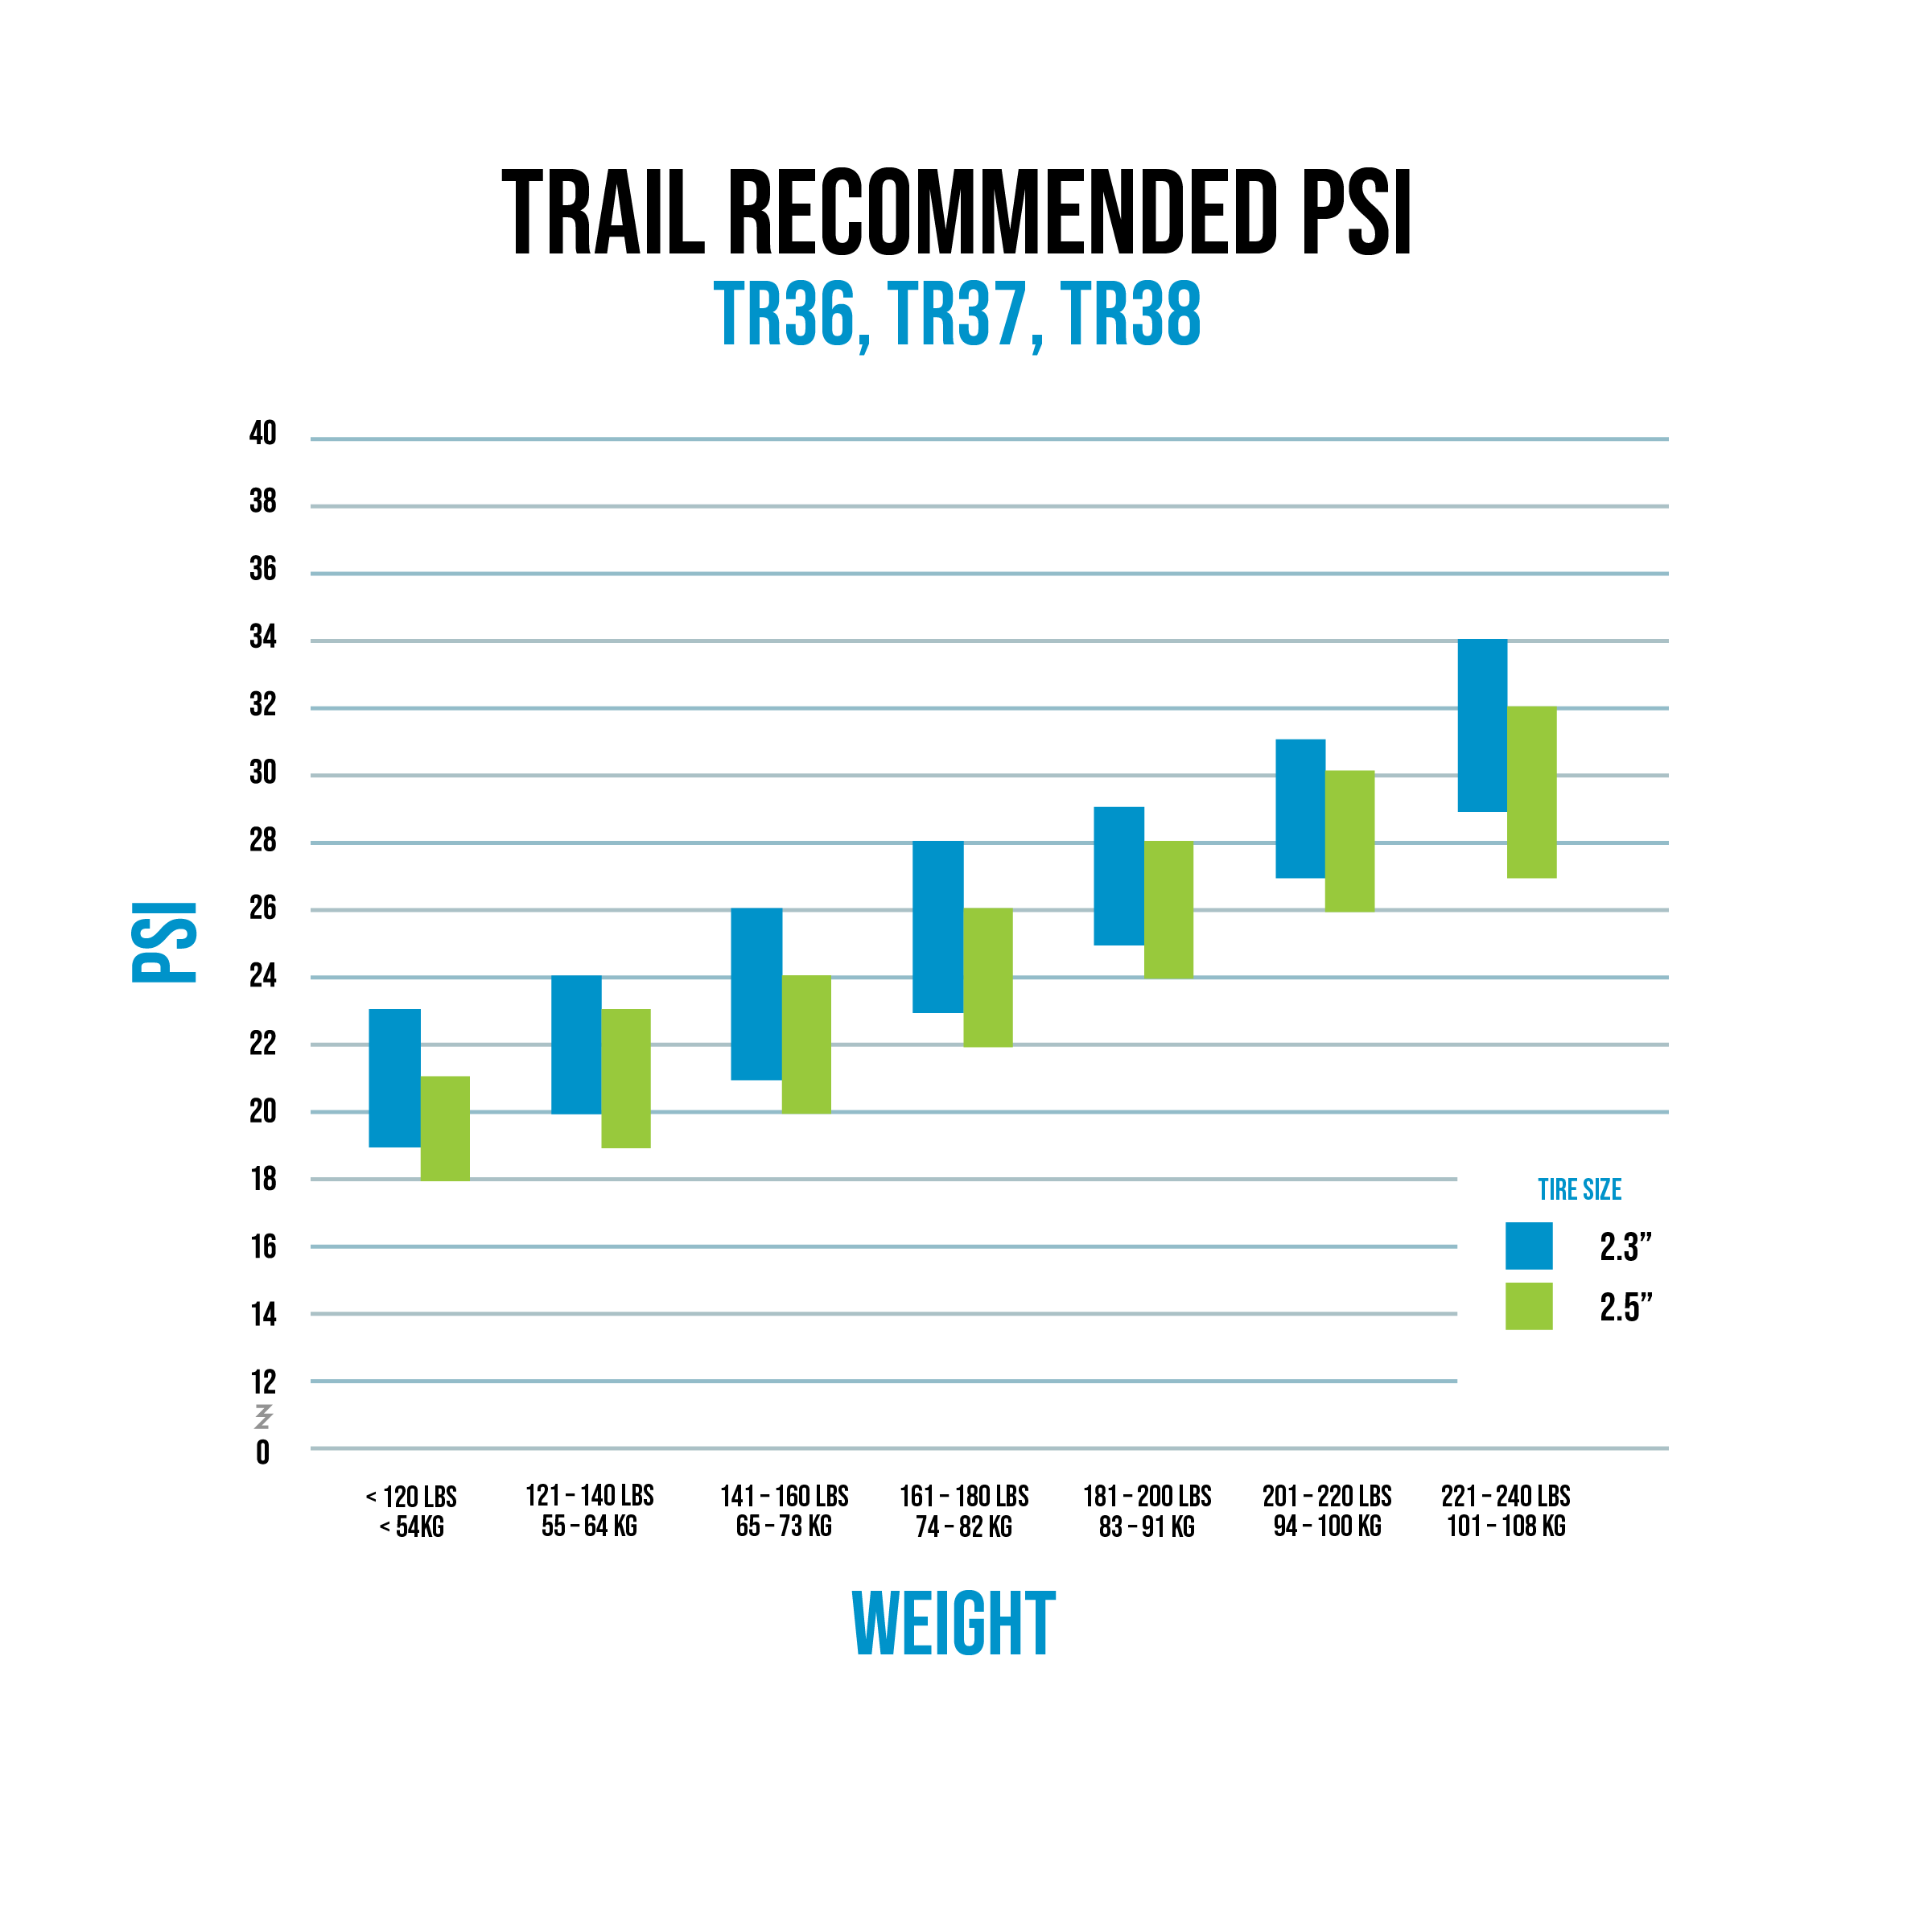
Weight is a major factor in tire pressure. More weight needs more pressure. It helps prevent tire squirm and punctures. Use a simple rule. Add pressure as weight increases. Here’s a guide:
| Weight Range (lbs) | Pressure (psi) |
|---|---|
| 100-150 | 25-30 |
| 150-200 | 30-35 |
| 200+ | 35-40 |
Terrain Variability
Change your pressure for different terrains. Lower pressure for grip on rough trails. Higher pressure for smooth paths. Here’s what to consider:
- Rocky trails: Less pressure, more grip.
- Smooth tracks: More pressure, faster ride.
- Mixed terrain: Find a middle ground.
Tire Volume And Width
Large tires need less pressure. They have more air volume. This means a softer ride. Narrow tires need more pressure. This ensures they can support your weight. Here’s a quick breakdown:
| Tire Width | Recommended Pressure (psi) |
|---|---|
| 2.0″-2.3″ | 30-35 |
| 2.4″-2.8″ | 25-30 |
| 2.8″+ | 20-25 |
Finding Your Optimal Psi
Mountain biking thrives on precision, from the twist of the handlebars to the flex in the frame. But one often overlooked aspect is tire pressure. Finding the perfect PSI (pounds per square inch) can transform your ride. It affects grip, comfort, and control. Let’s dive into how you can pinpoint that sweet spot.
Starting Points For Experimentation
Begin with manufacturer recommendations. These are found on the tire sidewall. Consider these numbers a baseline. Your weight plays a role too. Heavier riders may need more PSI; lighter riders, less. Start here and adjust as needed.
Use a reliable gauge. Consistent readings are key. Record your findings. Note how different pressures feel during your rides.
| Rider Weight | Front Tire PSI | Rear Tire PSI |
|---|---|---|
| Under 150 lbs | 22-25 | 24-27 |
| 150-200 lbs | 25-28 | 27-30 |
| Over 200 lbs | 28-32 | 30-34 |
Adjusting Psi For Riding Conditions
Riding conditions matter. Wet trails need more grip. Lower your PSI for these rides. Dry and rocky trails demand firmness. Increase your PSI to avoid punctures.
- Wet conditions: decrease PSI by 2-3.
- Dry conditions: increase PSI by 2-3.
- Technical terrain: lower PSI slightly.
Remember, changes should be small. Adjust slowly. Feel the differences. Keep track of how your bike handles. Find the PSI that works for you.
Gauging Pressure Without A Gauge
Setting the right pressure in your mountain bike’s tubeless tires is key. Yet, not everyone has a gauge handy. Fear not! You can still get a good estimate without one. Let’s explore how to gauge pressure with no tools.
Using Thumb Pressure
Feeling the tire with your thumb can reveal a lot. Press down hard on the tire. If it feels very soft and your thumb sinks in easily, it’s too low. A very hard surface that’s tough to press indicates too much pressure. Aim for a firm but slightly giving feel. This method isn’t precise but gets you in the ballpark.
The Bounce Test
The bounce test is another quick way to check. Here’s how:
- First, lift your bike a few inches off the ground.
- Then, let it drop.
- Observe how it lands.
If your bike bounces a lot, the pressure might be too high. No bounce at all suggests it’s too low. You’re looking for a minimal, controlled bounce. This indicates a well-set tire pressure.
Maintaining Tubeless Tire Pressure
Maintaining tubeless tire pressure is crucial for mountain biking. The right pressure offers a smooth ride. It also avoids punctures. Let’s explore how to keep the pressure just right.
Regular Checks
Regular pressure checks keep rides safe. Use a gauge every time before riding. This ensures optimal performance. Check after rides too. This helps notice any slow leaks early.
- Check pressure before rides.
- Inspect after rides for leaks.
- Note changes for maintenance clues.
Sealant Refresh Tips
Sealant helps prevent leaks. It seals punctures quickly. Refresh sealant regularly for best results. Here’s how:
- Open the tire carefully.
- Clean out old sealant.
- Add fresh sealant as needed.
| Tire Size | Sealant Amount |
|---|---|
| 26″ | 80-100ml |
| 27.5″ | 100-120ml |
| 29″ | 120-140ml |
Remember to check the manufacturer’s guide. It gives the right amount for your tires. Ride with the perfect tire pressure. Enjoy the trails with confidence.
Troubleshooting Common Tubeless Pressure Issues
Mountain bikers often switch to tubeless tires for better performance. Proper tire pressure makes rides smooth. But sometimes, issues arise. Let’s troubleshoot common tubeless pressure problems.
Bead Seating Problems
Bead seating secures the tire to the rim. Incorrect seating causes air to escape. Follow these steps:
- Check the tire and rim for debris.
- Apply soapy water to the rim. It helps the bead slip into place.
- Inflate quickly. A burst of air can set the bead.
Still struggling? A tire lever or a bead jack might help. Use them gently to avoid damage.
Persistent Leaks
Tubeless tires can leak over time. Here’s what to do:
- Identify the leak. Submerge the tire in water and look for bubbles.
- Check the valve core. Tighten it or replace if necessary.
- Inspect the sealant. Add more if it’s dry or insufficient.
Leaks at the rim? Apply tubeless rim tape. Ensure it covers the entire rim surface.
Credit: noblwheels.com
Advanced Tips And Tricks
Exploring advanced tips and tricks for mountain bike tubeless tire pressure can unlock new levels of performance. Whether it’s to gain speed, increase comfort, or adapt to changing conditions, the right pressure makes all the difference. Let’s dive into these expert strategies.
Balancing Speed And Comfort
Finding the sweet spot between speed and comfort requires experimentation. A lower tire pressure increases the contact area. This enhances grip but can slow you down. A higher tire pressure, on the other hand, reduces rolling resistance. It quickens your pace but may be less comfortable.
Consider these points:
- Rider weight: Heavier riders need more pressure for support.
- Terrain: Rough trails demand lower pressure for better traction.
- Tire width: Wider tires can run at lower pressures effectively.
Seasonal Adjustments
Seasons change, and so should your tire pressure. Summer heat expands air, increasing pressure. In contrast, colder temperatures in winter cause pressure to drop. Adjust accordingly for optimal performance.
Keep in mind:
| Season | Adjustment |
|---|---|
| Summer | Decrease by 2-3 PSI |
| Winter | Increase by 2-3 PSI |
Check pressure before every ride. Use a reliable gauge for accuracy. Stay adaptable to maintain peak performance year-round.
The Future Of Tubeless Tire Technology
The Future of Tubeless Tire Technology is bright and promising. Riders seek performance and comfort. Tubeless tires deliver both. No inner tubes mean fewer flats. They also allow for lower tire pressures.
This means better traction and a smoother ride. The technology evolves rapidly. Let’s explore what’s coming next.
Emerging Trends
New materials are shaping the future. These materials make tires lighter and more durable. Sealants are also improving. They are becoming more effective at sealing punctures. Riders can expect fewer interruptions and more time on the trails.
- Lighter tires for easier climbs
- Durable compounds resist sharp objects
- Advanced sealants fix holes quickly
Innovations On The Horizon
Exciting developments are underway. Smart tires are one example. These tires can adjust pressure on the fly. Sensors detect the terrain.
The tire adapts for optimal grip and comfort. This tech is still developing. Yet, it promises a revolution in ride quality and control.
| Technology | Benefit |
|---|---|
| Smart Sensors | Auto-adjust pressure for terrain |
| Self-healing | Seal punctures with no stops |
| Eco-friendly Materials | Better for the planet |
Frequently Asked Questions
What Pressure Should Tubeless Mtb Tires Be?
Tubeless MTB tire pressure typically ranges from 20 to 35 psi. The exact pressure depends on rider weight, terrain, and tire width. Experiment to find your optimal setting for the best balance of grip and efficiency.
What Pressure Should Mountain Bike Tyres Be With Tubes?
Mountain bike tire pressure with tubes typically ranges from 30 to 50 PSI, depending on rider weight and trail conditions. Always check the tire’s sidewall for specific recommendations.
How Much Air Should Be In Tubeless Tyres?
Tubeless tires typically require air pressure between 30 to 35 PSI, but always check your vehicle’s manual for the exact recommendation.
What Is The Pressure For A 26 Inch Bike Tire?
The pressure for a 26 inch bike tire typically ranges from 40 to 70 PSI. Always check the tire sidewall for the manufacturer’s recommended pressure. Maintaining correct pressure ensures optimal performance and safety.
What Is The Ideal Tubeless Tire Pressure?
For mountain bikes, the optimal tubeless tire pressure typically ranges from 25 to 35 PSI, depending on rider weight, terrain, and tire volume.
Conclusion
Selecting the right tubeless tire pressure for your mountain bike can make all the difference in your riding experience.
It enhances grip, comfort, and tire performance on diverse terrains. Remember, the perfect pressure varies based on rider weight, tire size, and trail conditions.
Experimentation is key to finding your ideal setting. Happy trails and smooth rides ahead!
Steven is a professional cyclist and his passion is cycling. He has been cycling for the last 6 years and he loves using bikes while outing as well. Based on his experiences with the different types of bikes; he is sharing his opinions about various bikes so that a beginner can start right away. Find him on Twitter @thecyclistguy Happy Biking.
Leave a Reply