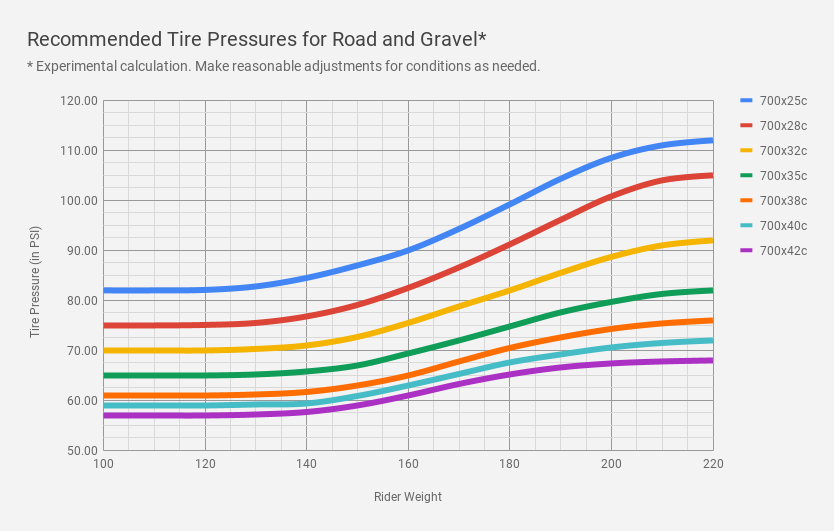
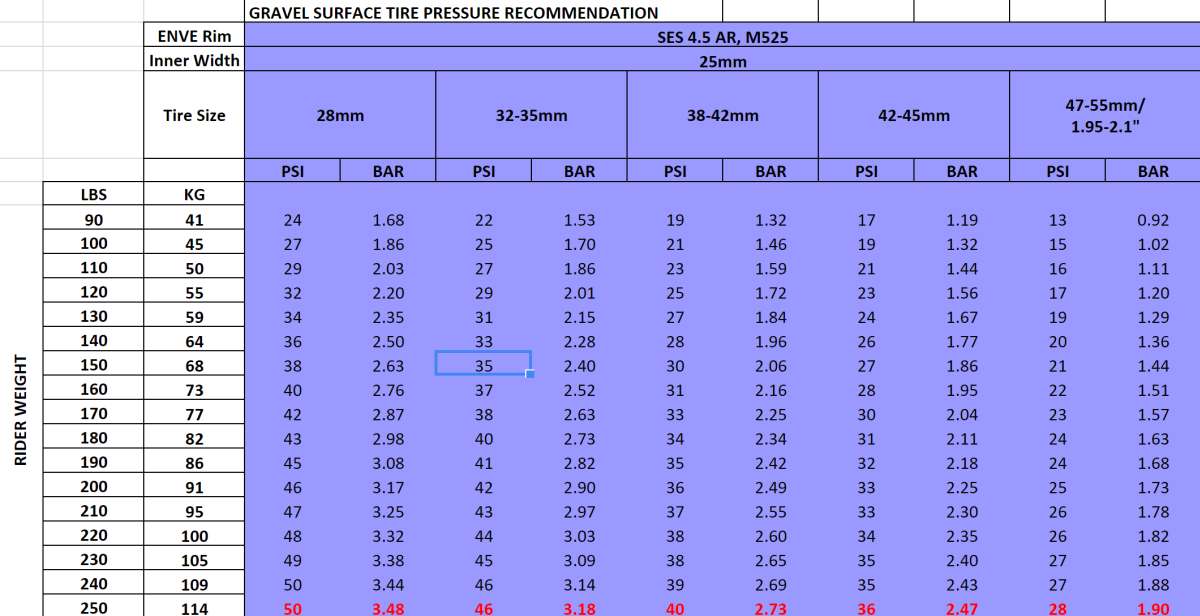
Gravel bike tire pressure typically ranges from 30 to 50 PSI. Factors like rider weight, terrain, and tire width influence the optimal pressure.
Gravel biking, a blend of road cycling and mountain biking, demands specific gear choices, with tire pressure playing a crucial role.
Striking the right balance in tire pressure is key to a smooth and efficient ride. Too high and you’ll bounce off every rock; too low and you risk pinch flats or rim damage.
Riders must consider the varied surfaces they’ll encounter, from loose gravel to mud, and adjust their tire pressure accordingly. This not only maximizes traction but also ensures comfort during longer rides.
With advancements in tire technology and the increasing popularity of gravel biking, understanding the nuances of tire pressure can greatly enhance your cycling experience.
Introduction To Gravel Biking
Introduction to Gravel Biking taps into the spirit of adventure. It combines elements of road and mountain biking, leading to a versatile, go-anywhere ride. Ideal for mixed-terrain adventures, gravel biking opens up a world of exploration.
The Rise Of Gravel Biking
Gravel biking has seen a surge in popularity. Cyclists seek new challenges beyond paved roads. This discipline brings a fresh perspective to cycling, emphasizing endurance and resilience.
Key Components Of A Gravel Bike
- Frame: Robust yet lightweight, designed for comfort over long distances.
- Tires: Wider for stability, with tread patterns that grip loose surfaces.
- Gearing: Versatile to handle steep climbs and rapid descents.
- Brakes: Disc brakes for consistent stopping power in all conditions.
Importance Of Tire Pressure
Understanding the Importance of Tire Pressure in gravel bikes is key. It affects how your bike performs, feels, and grips the ground. The right pressure can make your ride smooth and fast. Too high or too low, and it might not feel right.
Impact On Performance
Correct tire pressure makes your gravel bike roll faster. Lower pressure can help in rough terrains. But, too low can lead to more effort to pedal. Higher pressure is good for smooth surfaces. Yet, too high can slow you down on gravel.
- Lower pressure: Good for rough terrains.
- Higher pressure: Best for smooth roads.
Influence On Comfort And Traction
The right tire pressure ensures comfort while riding. It also affects how well your tires grip the ground. Let’s break it down:
- Comfort: Lower pressure can absorb shocks better. This makes your ride smoother.
- Traction: The right pressure gives better grip on gravel. It helps your bike handle turns and stops safely.
| Tire Pressure | Comfort | Traction |
|---|---|---|
| Low | High Comfort | Good Traction |
| High | Less Comfort | Less Traction |
Remember, finding the perfect tire pressure takes time. Start with the manufacturer’s recommendation. Then, adjust based on your weight and the ride’s conditions. This way, you’ll enjoy every ride on your gravel bike.
Factors Affecting Tire Pressure
Understanding how to adjust gravel bike tire pressure is key. It improves ride quality. It also boosts performance. Several factors can change the ideal tire pressure.
Rider Weight
Weight plays a big role in tire pressure. Heavier riders need more pressure. This stops tires from flattening too much. It also prevents rim damage.
Light riders can use lower pressure. This offers better grip. It also adds comfort on rough surfaces.
Terrain Variability
Gravel bikes tackle varied terrains. Each surface needs different pressures. Rough trails need lower pressure. This absorbs shocks. Smooth paths can handle higher pressure. This increases speed.
- Loose gravel: Go for lower pressure.
- Hardpacked dirt: You can add more pressure.
Tire Volume And Width
Larger tires need less pressure. They have more air volume. This cushions the ride. Narrow tires need more pressure. This prevents them from sinking in soft ground.
| Tire Width | Pressure Range |
|---|---|
| 35mm | 40-60 psi |
| 40mm | 30-50 psi |
| 45mm+ | 20-40 psi |
Finding Your Baseline Pressure
Finding the right tire pressure for a gravel bike is key. It can change your ride quality. Too high, and you’ll bounce around. Too low, and you’ll risk flats. Let’s find your baseline pressure.
Starting Points For Pressure
Think of tire pressure as your ride’s foundation. It’s essential to get it right. But where do you start? A good baseline can depend on several factors.
- Rider weight: Heavier riders need more pressure.
- Tire width: Wider tires generally require less pressure.
- Terrain: Rougher surfaces need lower pressure for grip.
Most gravel tires perform well between 30-40 PSI for a good mix of comfort and efficiency.
Adjusting From The Baseline
Once you have a starting point, adjust to find your sweet spot. Keep changes small, about 2-3 PSI at a time. Your goal is a smooth, controlled ride.
| Rider Weight | Tire Width | Suggested PSI |
|---|---|---|
| Under 150 lbs | 40mm+ | 30-35 PSI |
| 150-200 lbs | 35-40mm | 35-40 PSI |
| Over 200 lbs | Under 35mm | 40-45 PSI |
Feel your bike on different terrains. Notice how it handles. Adjust your pressure until it feels just right. Remember, personal preference plays a big role.
Tools For Measuring Pressure
Choosing the right tools for measuring tire pressure is key. It ensures your gravel bike performs well. A correct pressure gives you a smooth ride. Let’s talk about the tools you need.
Types Of Pressure Gauges
- Digital Gauges: Easy to read. They show precise numbers.
- Stick Gauges: Simple, long sticks. Good for quick checks.
- Dial Gauges: Have a needle and dial. Classic and reliable.
Each type has its perks. Digital gauges are most accurate. Stick gauges are light and easy to carry. Dial gauges are tough and last long.
Accuracy Matters
Getting the right pressure is a must. It affects your ride’s comfort and your bike’s grip. Here’s why accurate tools matter:
- Correct pressure improves ride quality.
- It prevents tire damage.
- Ensures safety on rough paths.
Choose tools that give precise readings. This way, you ensure your bike is always ready for adventure. Remember, the right pressure makes all the difference.

Credit: www.bikebarnracing.com
Adjusting Pressure For Different Conditions
Tire pressure can make or break a gravel bike ride. The right pressure improves grip and comfort. It varies with rider weight, tire size, and trail conditions. Let’s dive into adjusting tire pressure for varying terrains.
Wet And Muddy Trails
Lower tire pressure boosts traction on wet and muddy trails. It allows tires to conform to slippery surfaces. Avoid going too low to prevent rim damage.
- Soft terrain: drop 5-10 PSI.
- Wet conditions: aim for a supple feel.
- Experiment to find the sweet spot.
Rocky And Technical Routes
Higher pressure protects against sharp rocks. It prevents pinch flats on technical routes. Balance is key to maintain traction.
- Rough terrain: add 5-10 PSI.
- Pinch flat risk: higher pressure helps.
- Control: don’t sacrifice for firmness.
Maintaining Optimal Pressure
Maintaining optimal pressure in gravel bike tires is vital. The right pressure ensures a smooth ride. It also protects against punctures. Cyclists must find a balance for their riding style and conditions.
Regular Checks
Consistent tire pressure checks are crucial. They ensure tires perform well. Use a reliable gauge for accuracy. Check pressure before every ride. This helps to spot leaks early.
Dealing With Fluctuations
Temperature and terrain affect tire pressure. Riders may need to adjust accordingly. Carry a portable pump or CO2 inflator. This allows for quick changes on the go. Note the following for optimal pressure maintenance:
- Weather: Colder weather can lower tire pressure. Adjust it before you head out.
- Terrain: Rough surfaces may require lower pressure for better grip. Check the tire sidewall for limits.
- Weight: Heavier loads mean more pressure. Add air to support the extra weight.
Remember to stay within the recommended range. Your bike manual or tire sidewall has this info. Always adapt to maintain performance and safety.

Credit: www.youtube.com
Advanced Tips And Tricks
Ready to up your gravel bike tire pressure game? Advanced tips help you ride faster and smoother. Let’s dive in and fine-tune your setup for peak performance.
Fine-tuning For Racing
Racing demands precision. Start by checking manufacturer specs for a baseline. Then, tweak your pressure by 1-2 PSI at a time. Take short test rides to assess changes. Use a reliable gauge for consistent readings. Aim for a balance between speed and comfort. Remember, lower pressure increases grip but can slow you down. Higher pressure boosts speed but can be harsh on rough terrain.
- Check specs for baseline
- Adjust in 1-2 PSI increments
- Test ride after adjustments
- Balance speed and comfort
Seasonal Adjustments
Seasons change, so should tire pressure. In summer, heat expands air, increasing pressure. Start lower than usual. In winter, cold contracts air, dropping pressure. Begin with a higher PSI. Always consider terrain and weather before a ride. Wet conditions often call for lower pressure for better traction. Dry conditions might allow for higher pressure, enhancing efficiency.
| Season | Adjustment |
|---|---|
| Summer | Start lower |
| Winter | Start higher |
| Wet | Lower pressure |
| Dry | Higher pressure |
Check tire pressure before every ride. Use a pump with a built-in gauge for accuracy. Adjust according to the day’s conditions. Keep a record of pressures and outcomes to guide future settings.
- Check pressure before rides
- Use gauge-equipped pump
- Adjust for daily conditions
- Record pressures and outcomes
Common Mistakes To Avoid
Gravel Bike Tire Pressure needs careful attention. It affects ride quality, speed, and comfort. Many riders make mistakes when inflating their tires. Let’s explore common errors and how to avoid them.
Overinflation Issues
Setting the pressure too high can lead to problems. Overinflated tires decrease traction. They make rides uncomfortable. They can also cause faster tire wear. Avoid going beyond the recommended maximum.
- Decreased grip on loose surfaces
- Harsher ride feel
- Potential for premature wear
Underinflation Consequences
Too little pressure causes different issues. Tires can squirm and may impact control. Pinch flats become more likely. Underinflation also increases rolling resistance. Stick to the minimum suggested pressure.
- Poor handling and bike control
- Higher risk of pinch flats
- Increased effort to pedal

Credit: www.gravelcyclist.com
Frequently Asked Questions
What Psi Should Gravel Bike Tires Be?
Gravel bike tires typically require a PSI range between 40 to 80. Factors like rider weight, terrain, and tire width can influence the ideal pressure. Always consult your tire’s specific recommendations for the best results.
What Psi Should Gravel Roads Be?
For gravel roads, a tire pressure of 30 to 50 PSI is optimal, ensuring balance between traction and tire longevity.
Is 40 Psi Too High For Bike?
40 PSI can be too high for some bike tires, especially if they’re designed for lower pressure. Always check the manufacturer’s recommended PSI range for your specific tires.
What Should The Tire Pressure Be On A Gravel Rally?
For gravel rally tire pressure, aim between 28-32 PSI. This range offers optimal grip and durability on uneven surfaces. Always adjust based on specific rally conditions and car specifications for best performance.
What Is The Ideal Gravel Bike Tire Pressure?
Optimal gravel bike tire pressure varies with rider weight, but typically ranges from 30-50 psi for most conditions.
Conclusion
Selecting the right tire pressure for your gravel bike can transform your ride. It strikes a balance between comfort, traction, and efficiency.
Remember, the perfect pressure varies with terrain, weather, and your weight. Experiment to find your sweet spot.
Embrace the journey and let your adventures on the gravel path be limitless.

Steven is a professional cyclist and his passion is cycling. He has been cycling for the last 6 years and he loves using bikes while outing as well. Based on his experiences with the different types of bikes; he is sharing his opinions about various bikes so that a beginner can start right away. Find him on Twitter @thecyclistguy Happy Biking.


Leave a Reply